Saturday, June 15, 2013

Candy Bomb Cupcakes

So, unless you've been living under a rock for the past few months, or aren't on Facebook, or actually have a life, you have heard of the game Candy Crush Saga.  In a nutshell, it's a puzzle game played via your phone or Facebook in which you use combinations of colored candies to clear the board and advance levels.

Those of you who know me well, know that I'm really not a video game person.  When my children try to talk to me about games they play, I'm pretty sure my eyes glaze over.  Even when I was a kid myself, in the 80's, at the height of the video arcade days, I did not enjoy playing these games.  I did enjoy GOING to the arcade, but I'm sure that was more about the boys to be found in these establishments and less about the games.  Our family does have a Wii system and I can count on two fingers the number of times I've actually played it in the three plus years it has been in our home.  So, to sum up...me...not a game person.

Then it happened.  About 5 weeks ago I sprained my ankle while running.  For the first couple of weeks I had quite a bit of down time while trying to heal.  I read, watched some tv, and Facebooked from my phone.  I kept seeing my friends playing this Candy Crush game and I kept getting requests to play.  I will admit that in the past, I was one of those people who got quite annoyed by all the Farmville, etc., requests that I would get on Facebook.  But, as I was spending time on the couch, being bored, trying to keep from eating plates of brownies...I caved.  I downloaded the app, just to check it out.  That was about 3 weeks ago.  And I'm a goner.  Sucked in to the Candy Crush game playing world.  I don't know why it's so addicting, but it is.  The colorful game boards, the sounds of the candy being crushed.  It's really fun!!

So, when my friend, Caroline, sent me a link to this blog post, and asked me...no, BEGGED me, to make Candy Bomb cupcakes, well, of course I had to.  (Actually, I should mention that the candy bomb is THE candy you want in Candy Crush Saga.  It is made by getting 5 of the same candies in a row and it obliterates every candy of the same color that you pair it with.)  This is what I ended up with....


I think they are so stinkin' adorable!   I don't know about you, but I think sprinkles are a ton of fun anyway.  And when you cover your cupcake in them, it's even more fun.  So, go bake your favorite cupcakes (I made  minis), put a blob of your favorite frosting on top (I used a large round  piping tip to put a heap o' frosting on mine) and then roll 'em around like crazy in your favorite sprinkles.  Super fun.

And on a final note, just a brief PSA from me to you:  Stay away from Candy Crush Saga.  It's highly addictive and a major time suck.  I'm fairly certain I need an intervention followed by a 12-step program.  For real.  LOL!


Friday, May 17, 2013

Grandpa Rich's "Kick Butt Salsa"

I did not make up the name.  My father-in-law did.  So, if you have a problem with it...take it up with him!  LOL!  That being said, it is pretty kick butt.  If you don't like things so super spicy, you could eliminate or reduce the number of jalapenos you use.  Either way, I think you will find that this salsa has a really great flavor!

Unfortunately, this batch was totally devoured before I was able to take some nice pictures.  We will just have to make do with the not-so-great ones I took with my phone.


So, without further ado, here is the recipe.  I'm copying it, word for word, from the email Rich sent me many years ago.  I don't think he will mind.  :)

"Rich's Kick Butt Salsa

4 stalks celery, chopped
One carrot, chopped
3 medium tomatoes, diced (or one 28 oz can diced)
Juice of 2 limes
1 large onion, chopped
1 bunch of green onions, chopped
1/2 cup of corn
6 Anaheim peppers
4 jalapeno peppers
2 small Habanero chiles (optional as they are very hot)
1/3 cup brown sugar to taste
5 tablespoons soy sauce
1 bunch cilantro, chopped

1.  Chop celery, carrot, onion, Anaheim peppers, jalapeno peppers, and habanero peppers in handy dandy chopper.*  Remember that the habaneros are very hot and should not be touched with bare hands.
2.  In large bowl put chopped items, diced tomatoes, chopped green onions, juice of limes, corn, and add brown sugar and soy sauce to taste.  The brown sugar and soy sauce are the secrets of this recipe so don't be afraid to use them.
3.  Last but not least is the chopped cilantro.  Use the whole bunch.
4.  Mix all together and let set in refrigerator for a couple of hours until chilled.

Is best used the same day and won't keep long, but doesn't usually last long anyway. **

This is an old recipe I weaseled from a Vietnamese man on my design crew.  He liked salsa hot and it is.  He has since died but not from eating this stuff.  He used to drink Dave's Insanity Sauce by the spoonful.  I couldn't take a dab on the end of a toothpick." ***


*Rich gave me a cool Tupperware chopper for Christmas one year, long ago.  It has since died.
** He is really right about this.  It gets eaten very quickly!
*** LOL

Monday, March 4, 2013

Everything But the Kitchen Sink...


I don't really post much about cookies.  In fact, I think there might only be one cookie recipe here.  That is not to say that I don't bake cookies, because I LOVE to bake cookies, but they are usually just your everyday chocolate chip variety.  Maybe a peanut butter or an oatmeal here and there.  I did bake some, can I just say it, ridiculously good peppermint bark shortbread cookies over the holidays, and although my intentions were to get them onto the blog, well....you know how it goes.  Maybe next Christmas.  Or maybe a Christmas in July post...hmmm...that sounds like a good plan...

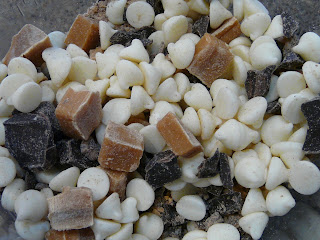
ANYWAY....THESE cookies...happened by chance.  I was cleaning out my pantry a couple of weeks ago, and was going through my baking supplies left over from the holidays.  I had a handful of white chocolate chips in one bag, some dark chocolate in another, as well as a few wrapped caramels.  Oh, and also some toffee baking bits.  A real hodge podge....not enough, individually, for any one recipe.  But what if I put them ALL into ONE batch of cookies?

           So, that's what I did.  I threw all those leftovers into a bowl...mixed 'em all up....


                                                Put them into a very simple cookie recipe....


                                                      And....this is what I ended up with!


                                                          Yes, please....with milk!!
                                                       

Everything But the Kitchen Sink Cookies

Ingredients:
3/4 cup white sugar
3/4 cup brown sugar (I used dark)
1 cup softened butter (you could use margarine, but, no offense...yuck. lol)
1 1/2 tsp pure vanilla extract
1 large egg
2 1/3 cups all-purpose flour
1 tsp baking soda
1 1/2-2 cups of whatever baking chips you want!  Go crazy!
*Btw...the cut the caramels into fourths

Directions:  Cream the butter and the sugar together in the bowl of a stand mixer (or however you normally make your cookies).  Beat the egg and vanilla lightly in a small bowl and then add to the butter and sugar.  Combine well.  Whisk the flour and baking soda together in another bowl, then add to the mixer. Combine.  Add your baking chips and mix with a wooden spoon.

Now, here is where you need some self-control and patience.  I have found that cookies turn out so much better if you refrigerate the dough for at least 2 hours, even better if it's overnight.  I almost never go overnight....my patience and self-control has it's limits.

So, now after your dough is refrigerated, and you are going crazy to get your cookies made, preheat your oven to 350 degrees F.  Drop the cookies onto parchment paper lined cookie sheets (I like to use a cookie scoop) and bake for about 10-11 minutes.  Let cool for a minute or two on the cookie sheets and then remove to a wire rack.

Friday, December 7, 2012

Peppermint Mocha Cupcakes and Christmas Cheer...

I have really been having a difficult time getting into the Christmas mood this year.  I don't know if it's because it seems like it came up sooo fast, or because I have been really busy and getting my house all Christmasy is seeming like another chore I need to complete, or possibly because it is STILL SO STINKIN' WARM HERE!!  I'm thinking it's a combination of these things.  At any rate, I needed to get myself into the mood and quick.  So I made some Peppermint Mocha Cupcakes!   Peppermint mocha lattes from Starbucks just scream Christmas to me, so why not a cupcake version?  Besides, food always makes things better anyway, right?

I have had the idea for these cupcakes on my mind since last Christmas, but never got around to putting it together.  If you love mint and chocolate together, then this is the cupcake for you.  The cake is so chocolatey and minty,with a hint of coffee, topped with vanilla butter cream frosting, chocolate ganache, and crushed candy canes.  You could even put a bit of peppermint extract into the frosting, if you so desired, but I thought it was perfect without.  And I noticed that after a day or two, the crushed candy canes kind of became melty and the mint flavor seeped into the frosting, which didn't look as pretty anymore, but sure did taste good!

And guess what?  After treating myself to one bite (ok, a little more than that) along with a mug of hot cocoa (ok, it was a glass of wine)....I was in the Christmas spirit!  I finished decorating my house, we put the Christmas lights up, and I can't wait to get on with the rest of the season.  Now, I'm not guaranteeing you will have this result, but if you are having some trouble getting into the holiday mood, bake these!  It's worth a shot, right?

P.S.  I did not get around to taking some nice pictures of these cupcakes, so you will have to settle for the one I took with my phone...sorry.  :)


Peppermint Mocha Cupcakes

Cupcake
Ingredients:
1 cup all-purpose flour
1 cup + 2Tbsp sugar
1/3 cup + 2 Tbsp cocoa powder
1/2 tsp baking soda
1/4 t salt
1/2 cup butter, melted and warm
2 large eggs
1 tsp pure vanilla extract
2 Tbsp instant coffee crystals (I used Starbucks Via)
1/2 cup brewed coffee
1/2 cup Andes Creme de Menthe baking chips

Instructions:
Combine the melted butter, eggs, and vanilla in a mixing bowl and beat for a minute or so on medium speed. In another bowl, combine the flour, coffee crystals, cocoa, sugar, baking soda, and salt.  Add the dry ingredients to the butter and egg mixture, combine and beat for about 20-30 seconds.  Scrape the sides of the bowl, add the hot coffee, and beat for another 20-30 seconds until the batter is smooth.  Fill cupcake liners about 2/3 full and bake at 350 degrees for 18-20 minutes.  Watch them carefully, and check them around the 16 minute mark.  I have found this recipe to be one that has a very fine line between done and overdone!  Remove from oven and cool for 5 minutes in the pan.  Cool completely on a wire rack.

Buttercream Frosting
Ingredients
2 sticks unsalted butter,  at room temperature
4-5 cups powdered sugar
1 Tbsp pure vanilla extract
3-4 Tbsp whipping cream or milk

Instructions:
Beat the butter in the bowl of a stand mixer until creamy.  Add 4 cups of powdered sugar, about 1/2 cup at a time, and beat well.  Add the vanilla and incorporate.  Add the whipping cream, one tablespoon at a time, until reaching your desired consistency.  Frost cupcakes your favorite way and decorate as desired.  I drizzled them with chocolate ganache and crushed candy canes.

Monday, October 22, 2012

Banana Cupcakes with Peanut Butter Buttercream!

Oh my goodness!!!!  Seriously, has it been over 2 months since I last posted a cupcake recipe???  I had all these lofty plans about all of the wonderful things I was going to bake and tell you all about over the summer.  Where in the world did the time go?  And then school started, and well....I don't have to tell you guys how busy life gets.

Now, don't get me wrong....I baked like a crazy girl, all summer long.  (The "crazy" part being that I regularly turned my oven on while it was a million degrees outside here in Phoenix!)  I will probably eventually get around to posting some of those things, but I think right now I'm going to start fresh and  tell you about these tasty cupcakes I made last week.....

I think I might be in love with these cupcakes.  Which is kind of funny because, frankly, I don't love bananas. I only kind of like them.  But lately I have been finding myself craving them every now and then. Maybe it's because I sort of accidentally discovered how good they taste frozen, with a little bit of chocolate syrup drizzled over them.  Maybe I have a vitamin deficiency that can only be satisfied with bananas.  Maybe it's because my mom has been bringing us so many bananas that I had to start freezing them so they wouldn't go bad (hence how I found out the frozen chocolate thing).*   I don't know.  But, what I do know, is that I had a hankering to make a banana cupcake.  And I knew that peanut butter and chocolate had to somehow figure in. And the result was this......


Super moist banana cake with ridiculously peanut buttery buttercream frosting, topped with a chunk of Reese's cup, and drizzled with chocolate ganache.  The frosting is really rich and the cake is like banana bread in cupcake form, so the two balance each other out.  Like I said before, I think I'm in love with this cupcake, and I think you will be, too.  You need to make these immediately....you know you want to.


Banana Cupcakes
{makes about 12}

Ingredients:
1 1/4 cups all purpose flour
1 1/2 teaspoon baking powder
1/4 teaspoon salt
1/2 teaspoon baking soda
2 large bananas, very ripe, mashed
1/2 cup sour cream
1 1/2 teaspoon pure vanilla extract
3/4 cup sugar
1/2 cup unsalted butter, room temperature
1 egg + 1 egg yolk

Directions:
Preheat the oven to 350 degrees F.  Line cupcake pans with paper liners.  Whisk together the flour, baking powder, baking soda, and salt in a medium bowl and set aside.  In a small bowl, combine the sour cream and vanilla with the mashed bananas.

In the bowl of a stand mixer, beat the butter and sugar until light and fluffy.  Add the egg and yolk and beat until well blended.  Add the flour and sour cream/banana/vanilla mixture alternately, beginning and ending with the flour.  Beat each addition until just blended.

Fill cupcake liners about 2/3 -3/4 full.  Bake for about 18-20 minutes.  Allow to cool in pans for about 5 minutes and then remove to wire rack to cool completely.

{Source:  Bon Appetit}


Peanut Butter Buttercream

Ingredients:
1 cup creamy peanut butter
1/2 cup unsalted butter, room temperature
4-5 cups powdered sugar
1/2 cup milk

Directions:
In the bowl of a stand mixer, beat the peanut butter and butter together until smooth.  Add the powdered sugar, one cup at a time, and beat well.  Add the milk and beat until creamy.  You can add more milk or powdered sugar to reach your desired consistency.  Frost and decorate the cupcakes your favorite way!

* Just a little side note regarding bananas... I have found that if you peel a bunch of bananas, place them in freezer bags, and freeze, they work great for so many things...from banana smoothies to an afternoon snack drizzled with chocolate syrup!


Monday, August 6, 2012

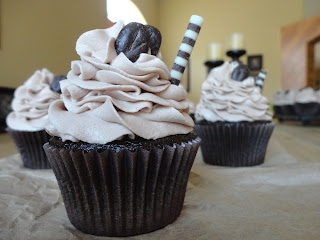
Chocolate Brownie Cupcakes with Mocha Cappuccino Hazelnut Frosting....

Wow!  Just the name alone is a mouthful!  I suppose I could have come up with something that told the story in fewer words, but I just couldn't think of anything that accurately described all of the flavors in this cupcake.  So, Chocolate Brownie Cupcake with Mocha Cappuccino Hazelnut Frosting is what it is to me.  You can call it whatever you want.  lol

Let's start with the whole mocha cappuccino hazelnut part.  I learned about this crazy stuff made by Jif from a blog I love called Love From The Oven.  She always knows about the most amazing products!  So, when I actually came face to face with this sin-in-a-jar at Target last week, my mind was swirling with ideas of ways to use it.  The most obvious way, for me, anyway, was frosting.

Who comes up with these ideas??  Geniuses.  That's who.

And, what better flavor of cupcake to put this frosting on than chocolate.  A chocolate cupcake with actual coffee in the batter.  Oh, and brownies.  IN the cupcake. (This is another fun trick I learned over at Love From The Oven.  You really should go check her out.  She's awesome.  And in Phoenix.  Which makes her even more awesome.  Only truly hard core bakers turn their ovens on in Phoenix in the summer!)

I put all of these fun things together and ended up with this....


I just love the color of the frosting.  So pretty.  And I finished them off with chocolate mocha beans and chocolate cigars.  I just love little touches like that, don't you?  Of course, now that it is all said and done, and all of the cupcakes are eaten, I realize that I didn't take a picture of the brownie bottom.  :(   You will just have to use your imagination.  And you will want to run, not walk, yourself over to Target and buy some Jif Mocha Cappuccino Hazelnut Spread so you can make these cupcakes!

Do you think Jif would use me for a commercial?  ;)

Chocolate Brownie Cupcakes with Mocha Cappuccino Hazelnut Buttercream Frosting

You will need:
1 box of your favorite brownie mix, prepared as directed.*
1 batch of your favorite chocolate cupcakes.  I used this one.**

Preheat your oven.  Line your cupcake tins with paper liners.  Prepare your brownie batter and your cupcake batter.  Put a dollop of brownie batter (I used about a tablespoon or so) in the bottom of each paper liner.  Fill liners with cupcake batter and bake as directed.  Allow the cupcakes to completely cool before frosting.

Mocha Cappuccino Hazelnut Buttercream Frosting

1 cup (2 sticks) unsalted butter, at room temperature
5 cups powdered sugar
3-4 T Jif Mocha Cappuccino Hazelnut Spread (depending on your taste)
1 tsp pure vanilla extract
milk or heavy whipping cream

In the bowl of a stand mixer, beat the butter until light and creamy (about 4 or 5 minutes).  Add the powdered sugar, 1/2 cup at a time, and beat until incorporated, scraping down the sides as you go.  Add the vanilla and the hazelnut spread.  I recommend adding the spread a tablespoon at a time until you achieve a flavor you like.  I thought it was pretty strong tasting.  Then add the milk or whipping cream, one tablespoon at a time, until you reach your desired consistency.  Frost the cupcakes however you like!


* I put the left over brownie batter in a pan and baked it so none would go to waste.  Can't let that happen!  AND I used some left over peanut butter frosting on the top of those brownies, which was a stroke of genius in and of itself.  But that's another story for another day.  :)
**  I halved the chocolate cake recipe so I only had a dozen cupcakes.


Wednesday, July 18, 2012

Watermelon Cupcakes

In keeping with the summer theme I started Monday with the Pink Lemonade Cupcakes, today I'm going to share Watermelon Cupcakes!  Remember I said the other day that very few things say "summer" like lemonade?  Well, watermelon most definitely falls into that "very few things" category...wouldn't you say?

When I first made these cupcakes a couple of weeks ago, I wasn't sure they had quite the watermelon flavor that I was looking for.  I kind of toyed around with the idea of adding watermelon extract (which is expensive and hard to find, by the way), or maybe even adding some watermelon Kool-Aid mix.  Just to give it an extra punch of flavor.

However, when the Buttercream Dreams taste testers (aka: husband and children) gave their opinions, 3 out of 4 thought that they tasted just right.  Now, to be completely forthright, the fourth tester deemed them to be "a little bit of disgusting."  But, I will add that she also thought my chocolate cupcakes were "too chocolatey" (is that even possible?) and she dips her broccoli into ketsup.  I really didn't have any problem disregarding her opinion on the watermelon cupcake.  :)  So, the cake recipe remains as I found it here: From Apples 2 Zucchini.

The watermelon flavor is very mild and the cupcakes are moist.  Topped off with a sweet buttercream frosting with just a hint of watermelon flavor makes them perfect!  I also tossed a handful of mini-chocolate chips into the batter to look like seeds and sprinkled a few on top of the cupcakes.  I thought they turned out terribly cute.  If you love watermelon and all of it's summeriness (is that a word?), I really hope you will try these!  And if you decide to add some watermelon extract, you can find it here: where to order watermelon extract if you can't find it in a store.  :)


Watermelon Cupcakes
{makes about 12}

Ingredients:
1 1/2 cups all-purpose flour
1 cup sugar
1 egg
1/2 cup unsalted butter, softened
2 tsp baking powder
2/3 cup watermelon juice*

Directions:
1.  Preheat your oven to 350 degrees F.  Line a cupcake pan with paper liners.  Sift the the dry ingredients together in a bowl.  Set aside.
2.  In the bowl of a stand mixer fitted with the paddle attachment, cream together the butter and sugar until light and fluffy, about 5 minutes.  Add the egg and beat until incorporated.
3.  Add the dry ingredients to the wet and mix to combine, scraping down the sides of the bowl as needed.
4.  Add the watermelon juice and mix until well incorporated.  At this point you could also add a drop or two of pink or red food coloring.
5.  Bake for 15-20 minutes.  Remove from oven and allow to cool in pans for 5 minutes, then cool completely on a rack before frosting.

* I obtained my watermelon juice by cutting up a fresh watermelon and pureeing in my mixer.  Then I put the puree into a strainer to get the juice.

{source of cupcake recipe: From Apples 2 Zucchini

Watermelon Buttercream Frosting

Ingredients:
3 sticks unsalted butter, at room temperature
6 cups powdered sugar
1/2 tsp pure vanilla extract
6 Tbsp watermelon juice

Directions:
In the bowl of a stand mixer, beat the butter until smooth and creamy.  Add the powdered sugar, about 1/2 cup at a time, and continue to beat until smooth.  Add the watermelon juice, one tablespoon at a time, and beat until reaching your desired consistancy.  If you need to , add a little bit of milk or heavy whipping cream.   Frost the cupcakes your favorite way!